
Download this guide, open it as markdown or explore our other manuals using the buttons above.
Use (Ctrl or CMD) + K to activate fuzzy search.
Why Drop & Render
Drop & Render is a premier managed render farm solution designed with both freelancers and studios in mind. You send us projects that take hours to render, and we'll have them ready for you in minutes.
- Seamless integration: Our plugin integrates directly into Cinema 4D, Blender and Houdini.
- Managed servers: We bring the hardware, you bring the project. No need to maintain your own infrastructure or set up any virtual environments.
- Plug and play: We take your projects as they are. Drop & Render is built around your projects, not the other way around.
- Outputs where you expect: Downloads go straight to your project folder. Just like rendering locally.
- Dedicated support: You can always reach real people with long term experience in 3D rendering for all of our supported platforms.
System requirements
Our tools support both Windows (8 and up) and MacOS (10.15 and up), with Linux support on the way. All of the computation is done in our cloud, so the only system requirement is being able to open your project in Houdini.
Setup & installation
To use Drop & Render, you first need to create an account. Once this is done, head over to the dashboard and download the Cloud manager application for your operating system.
Once installed you can open it as:
- Windows: Drop and Render User Interface
- MacOS: Applications / DropandRender / cloudui
The application will then prompt you to install one of our plugins. Pick Houdini, and follow the instructions. Our plugin will then be installed into your package directory.
You can find more information on our toolbox, including the Cloud manager and our web dashboard in our Drop & Render manual.
Core concepts
Distribution of work
Our datacenter is filled with top-of-the-line machines optimized for 3D rendering. When you submit a job we will split it into many smaller chunks, and give each to an independent machine. This means that your job can be rendered by 50+ machines all at the same time.
Slices & slice numbers
Optimize your render with a Custom Slice Number
Slices are the chunks we split your project into, and the number of frames that are processed by each chunk is its "slice number". Rendering multiple frames in one slice means you reduce the number of times Houdini has to initialize the project. The slice number defaults to 1, but this is not always optimal.
Each job has a startup overhead of 1-2 minutes due to Houdini itself. For a render that takes 30 seconds per frame on our machines, this effectively means that with a slice number of 1, each machine will charge you for up to 2 and a half minutes, even though your render only took up 20% of that time.
Increasing the slice number helps reduce this extra cost - by rendering more frames per slice
you reduce the number of startups. In the above case, if your render has 10 total frames and
you set the slice number to 10, you'll end up doing 5 minutes of rendering for each 2 minutes
of startup. This means your total render time goes from ~25 minutes (2.5 minutes * 10 frames)
to only 7 minutes (~72% faster & cheaper) (2 minutes + 30 seconds * 10 frames) executed
concurrently with 10 machines working at once.
Tip: Aim for approximately 20 minutes of total work per slice (startup + rendering).
Queues and priority
Machines are assigned to slices based on our priority system. We have 3 priority levels, Sapphire (lowest), Emerald (medium) and Diamond (highest). The higher your priority, the further ahead your slices go in the global queue and thus the faster your job will complete.
Each priority level carries a multiplier of cost, with Sapphire standing as the base price. However, the extra costs apply only when the higher priority made a difference. If there are machines immediately available, you will only be charged Sapphire costs even if you choose the Diamond priority.
Tip: For production deadlines, we recommend using the Emerald or Diamond priorities. Use Sapphire when the deadline isn't strict, such as overnight renders or other non-urgent work.
Cloud manager
The Cloud manager is our desktop application forming a bridge between your local workstation and our render farm. It handles uploading files, submitting & monitoring jobs and automatic downloads. Once your job is uploaded your machine is free to do anything else, including shutting down your machine or doing local renders.
Note: Auto-downloads will only work while the Cloud manager is open. You can always download your outputs for up to 7 days after job completion using our Web dashboard.
The sync system
Drop & Render uses an intelligent syncing system with hash-based file comparisons and aggressive de-duplication. When you first upload a file we store a hash of it, which we can then check against any future uploads. If the local and remote hashes match it means the file hasn't changed, so it doesn't need to be re-uploaded. This drastically reduces upload costs when re-rendering alterations of the same project.
Assets uploaded by team members are automatically available for everyone in the studio. They are stored for 7 days after their last usage. We allocate 5TB of storage per studio account by default. More is available on request through our support system.
The download system
Our download system delivers files to your disk exactly as the render would if it was executed locally on your workstation. Downloads are initiated once a full slice is completed, and will automatically handle everything for you. You can even completely close the Cloud manager (once everything has uploaded), and your downloads will resume the next time you open it. Downloads are stored for 7 days after creation.
You can choose downloads on a per-job basis. You likely always want to retrieve final render results, small to medium caches or preview frames, but large caches, intermediate files (used by other jobs as intermediaries) and other unnecessary outputs can be disabled so they stay on the farm.
Tip: For simulations, disable downloads and let the farm keep the cache. Your render job can then reference those files by going to the Assets tab and selecting "Add synced assets".
Managing dependencies
Understanding render dependencies
To submit a project, simply add the Drop & Render HDA to your network. Our system reads the connections in your node graph to determine the render order. You can submit up to 100 jobs in a single submission.
The way you wire your nodes tells our farm how to prioritize tasks.
Parallel Rendering (Independent Jobs)
Use this method when jobs do not interact with each other and can be rendered simultaneously to save time.
How to connect: Wire multiple nodes directly into the Drop & Render HDA input.
Result: The farm spins up separate machines for each job immediately.
Sequential Rendering (Dependencies)
Use this method when one task (like a simulation) must finish before the next one (like a render) begins.
How to connect: Chain your nodes together in a line. Connect only the final node to the Drop & Render HDA.
Result: The farm respects the chain. Job B will not start until Job A is 100% complete.
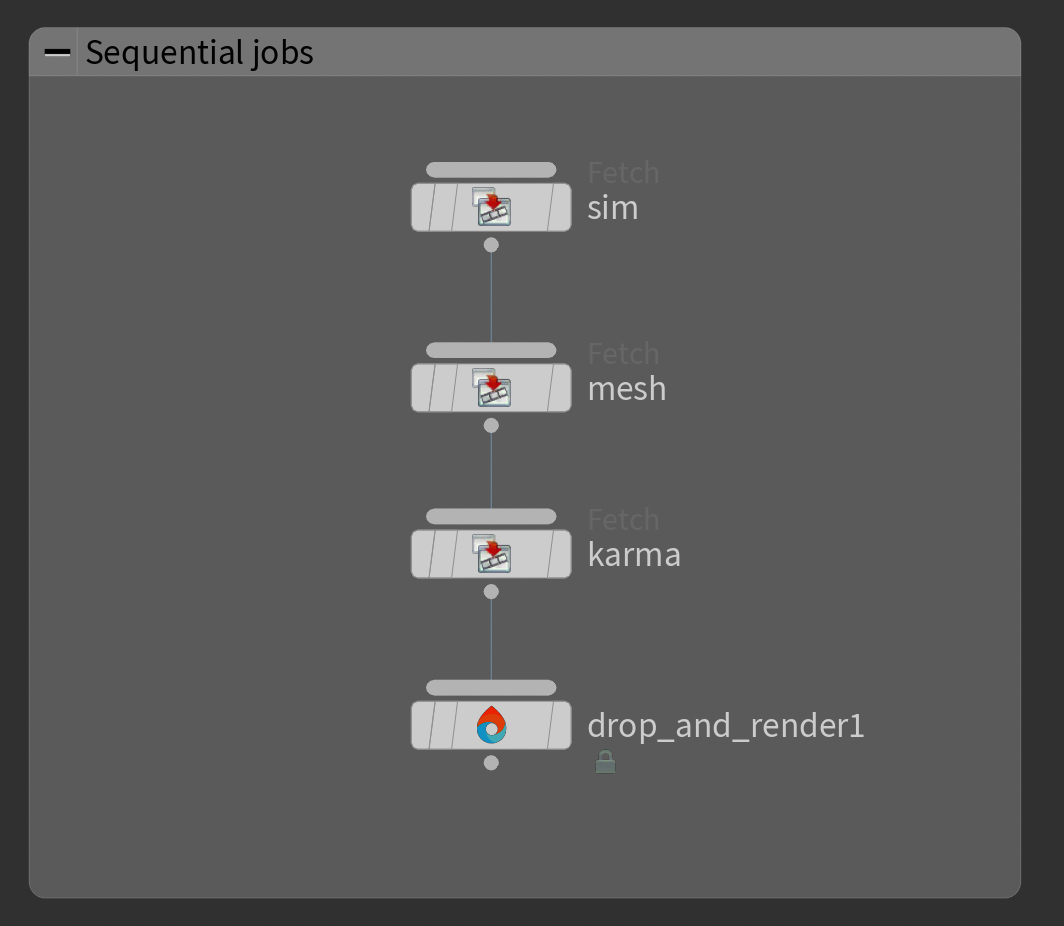
Example: In this example we fetch three nodes in a chain, with the final node connected to the Drop & Render HDA. The order is clear: simulation first, then mesh generation, then the Karma render.
The farm follows this chain exactly like Houdini would locally. The next job will not begin until the previous one is fully completed, ensuring the output is always correct and up to date.
Mixed Workflows (Complex Dependencies)
Most production scenes require a mix of both methods. You might have several independent simulation chains that need to finish before a final render occurs.
You can wire your setup just like you would locally and our farm will understand how to handle it.
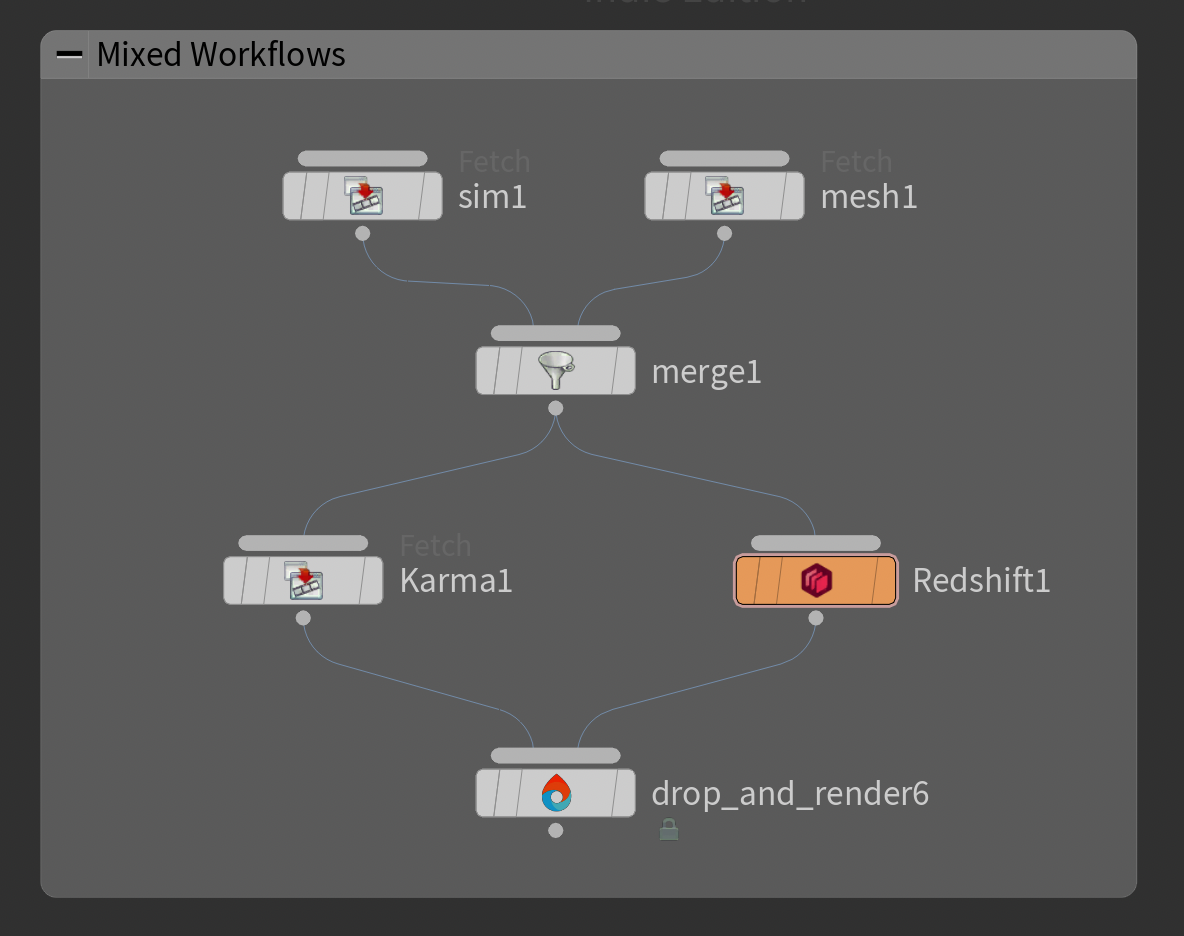
Example: In this example we combine sequential and parallel tasks. The simulation filecache and mesh filecache are processed first, either chained directly or merged with a Merge node to keep the network tidy.
Once both caches are complete, the final Karma and Redshift renders are triggered. Because these final renders do not depend on each other, the farm starts them at the same time, giving you parallel speed without losing dependency accuracy.
Using merge nodes
When you need to combine outputs from parallel jobs before sending to Drop & Render, use Houdini's Merge node. This is useful for combining multiple geometry streams, render passes, or cached sequences.
[Simulation A] ───┐
[Simulation B] ───┼──> [Merge] -> [Drop & Render]
[Simulation C] ───┘
The Merge node waits for all inputs to complete before passing data downstream, ensuring all dependencies are resolved before the farm processes the merged result.
Using fetch nodes
Fetch nodes (ROP Fetch, SOP Fetch, LOP Fetch) let you reference nodes from other network contexts without creating hard dependencies. This is useful for building complex submission graphs.
Example use case:
/obj/geo1/simulation -> [File Cache]
/out/rop_fetch1 [references /obj/geo1/file_cache] -> [Drop & Render]
The fetch node pulls the simulation result into your ROP network, letting you organize submissions cleanly without duplicating nodes or creating unwieldy wire connections across contexts.
Version matching
Drop & Render supports all major Houdini render engines and many popular plugins out of the box. We always use the closest matching version we have available, for both Houdini itself (guaranteed major version matches, as well as the closest bugfix release we have - 21.0.x, 20.5.x, etc.) and any plugins.
You can see information on what versions we are using in the Scene check panel. For further information, check the plugins & engines section.
Drop & Render Houdini plugin
Our plugin provides a drop_and_render node to place in your scenes. After creating an
instance in your scene graph, you can connect any number of nodes to it to send to the
farm.
Where to add the HDA
The Drop & Render node works in any Houdini network context. You can add it wherever your workflow needs it:
- ROP context (
/out): For traditional rendering workflows - LOP context (
/stage): For USD/Solaris and Karma renders - SOP context (
/obj/geo): For simulations and geometry caching - TOP context (
/tasks,/obj/topnet): For PDG workflows
Press Tab in any of these contexts, type "drop", and select Drop and Render to create the node.
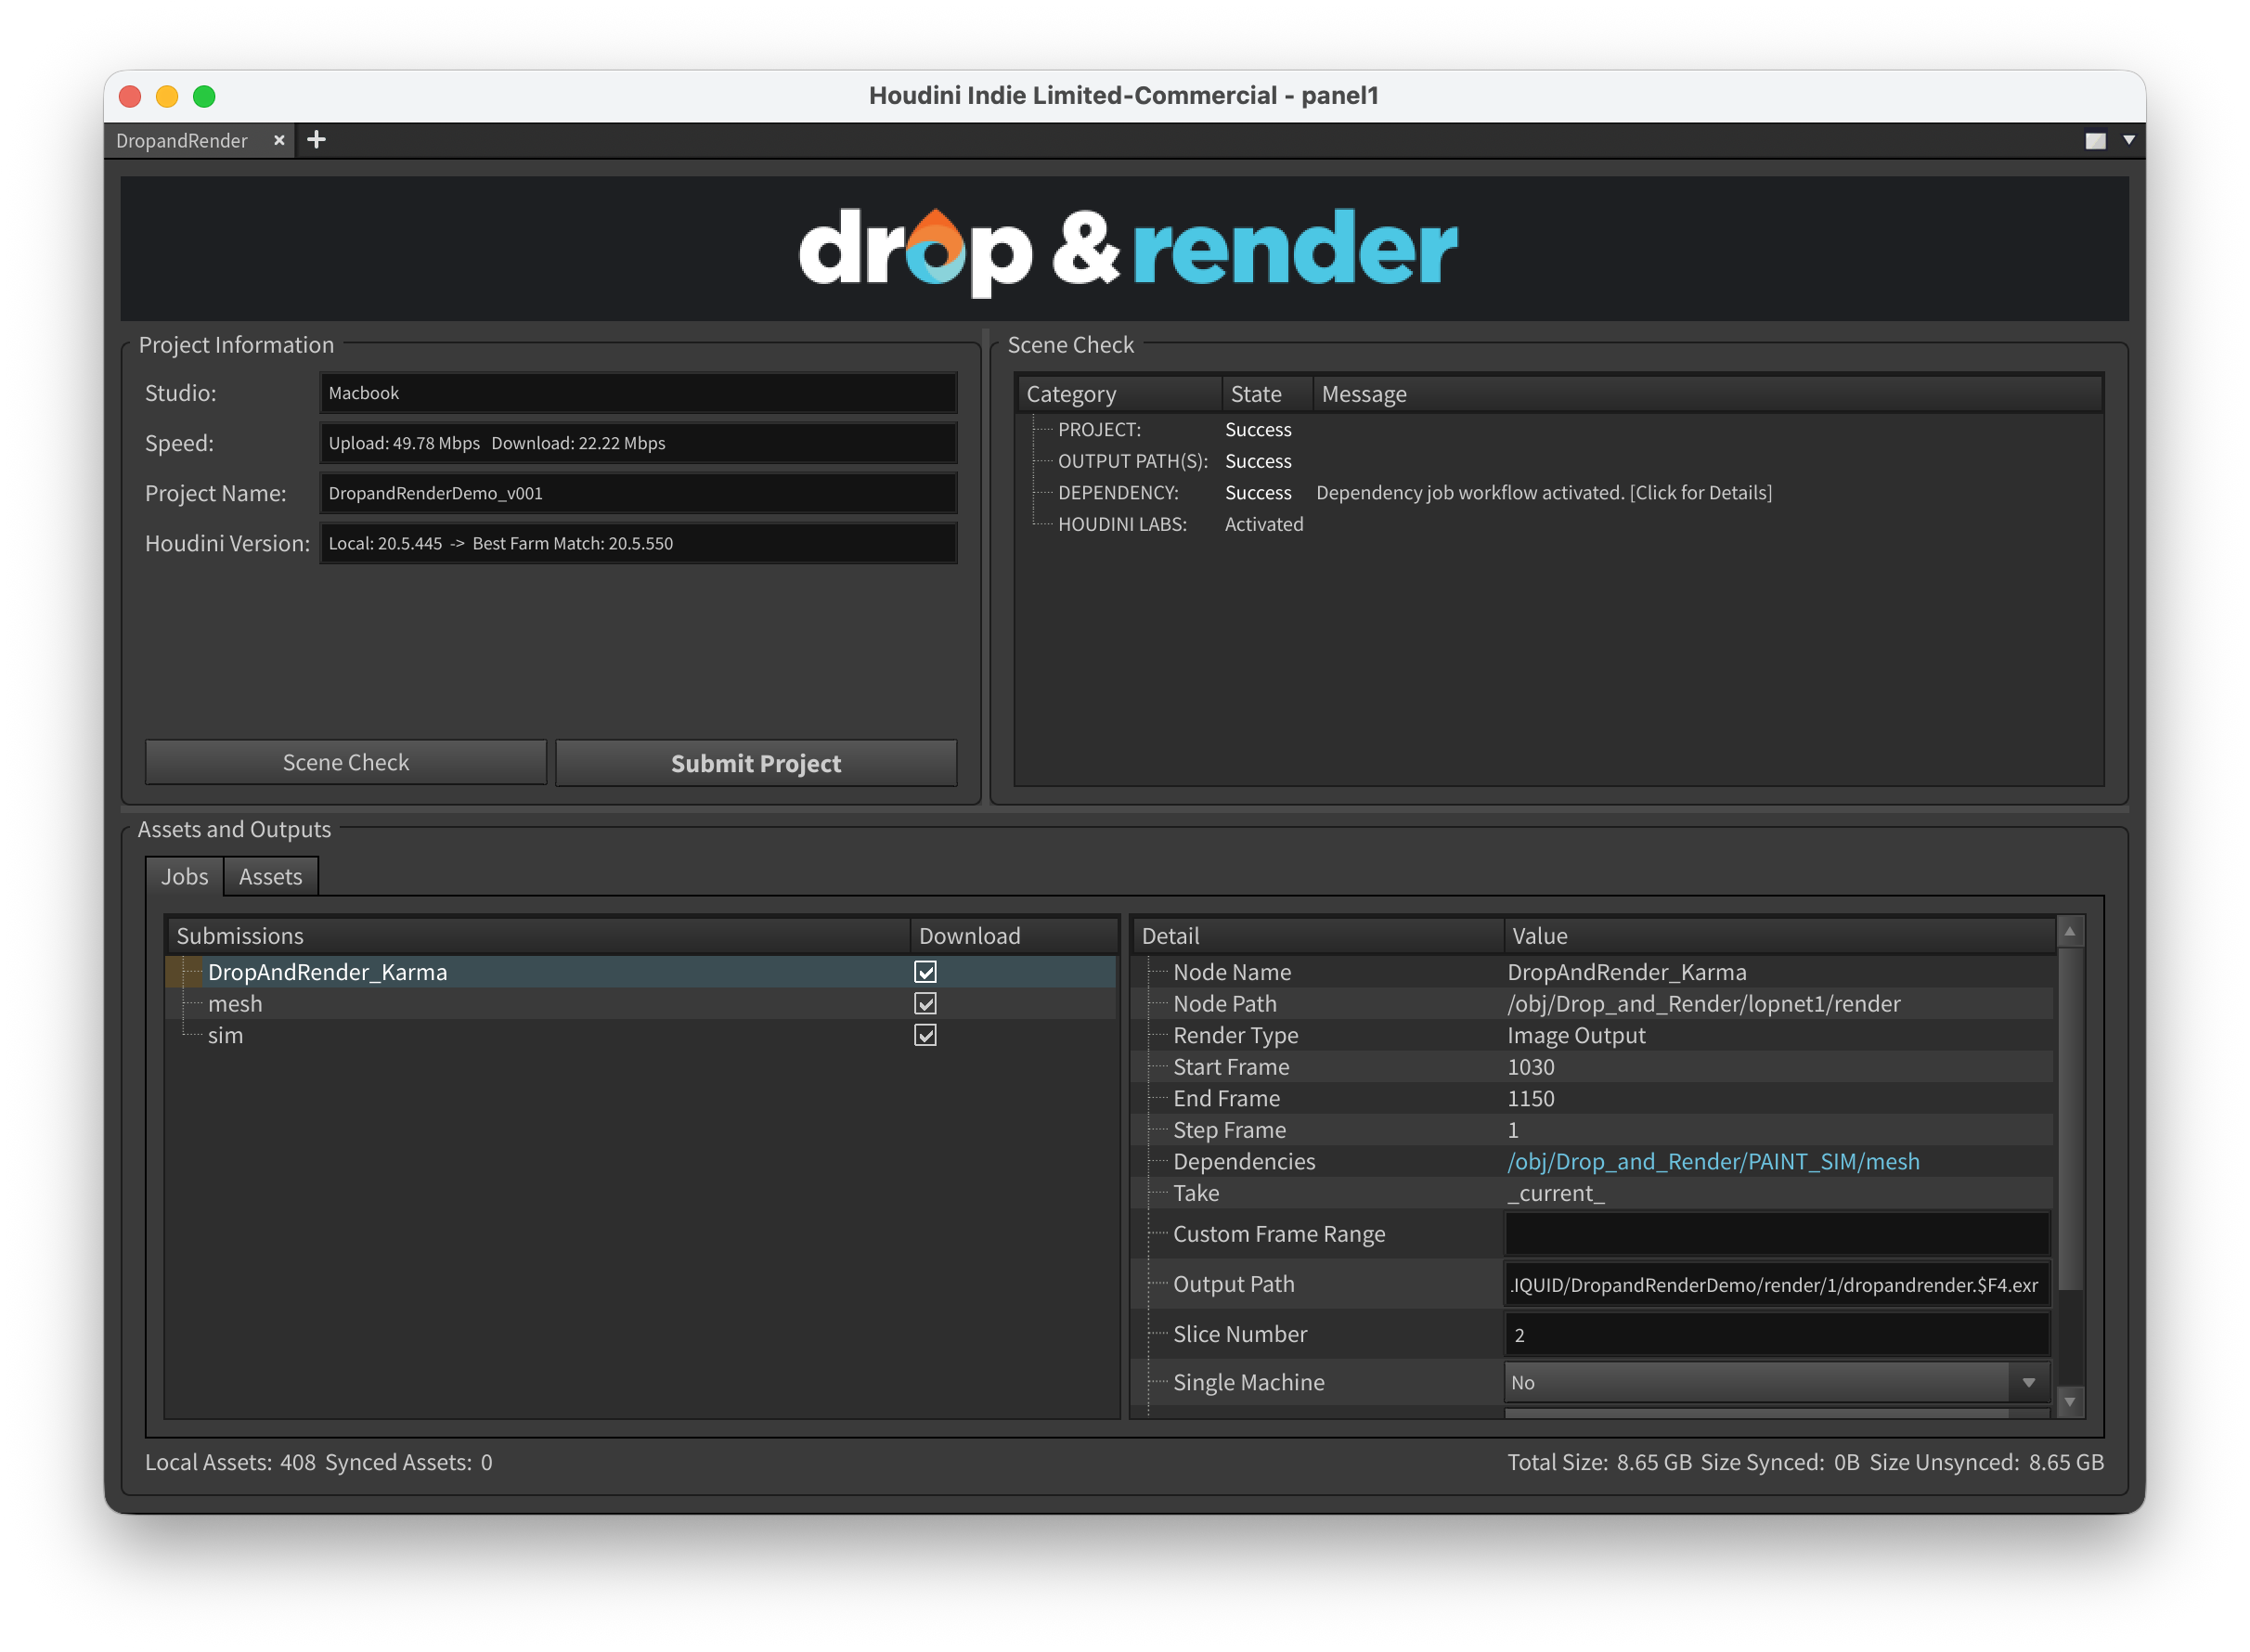
Checking and submitting jobs
You can use the scene check panel, accessible by pressing "Submit project" in our node's inspector, to submit your jobs.
1. Initiate a scene check
Press the "Scene check" button to run our internal analysis of your project. We will make sure everything is in order & collect any errors or warnings. Once the process is complete you'll see the panel populate with all information you need.
2. Fix warnings and errors
Check the output in the "Scene check" section. You should have nothing to fix in most cases, but if you do all the steps will be documented here.
Our systems should pick up all assets required by your scene. Sometimes we notice references that aren't necessary for your nodes. You can click "Ignore" on these, and we won't bother you about them anymore.
3. Validate per-submission settings
Each submission will have different settings available based on its type. Just click on them, and make any adjustments necessary.
4. Manage uploaded assets
We try to reuse as many assets as possible between submissions. Any static content, like textures, will automatically be uploaded and reused if you submit multiple times. You can manually set non-static assets to upload to reduce the workload on the server if it doesn't change between submissions (like a simulation you don't change between runs).
Everything with "include" checked in this panel will be uploaded to the server. If "already synced" is checked the asset is already on the server, and will not be uploaded again.
Additional options
Asset management
Our "Assets" panel lets you monitor and manage all the files that belong to your jobs.
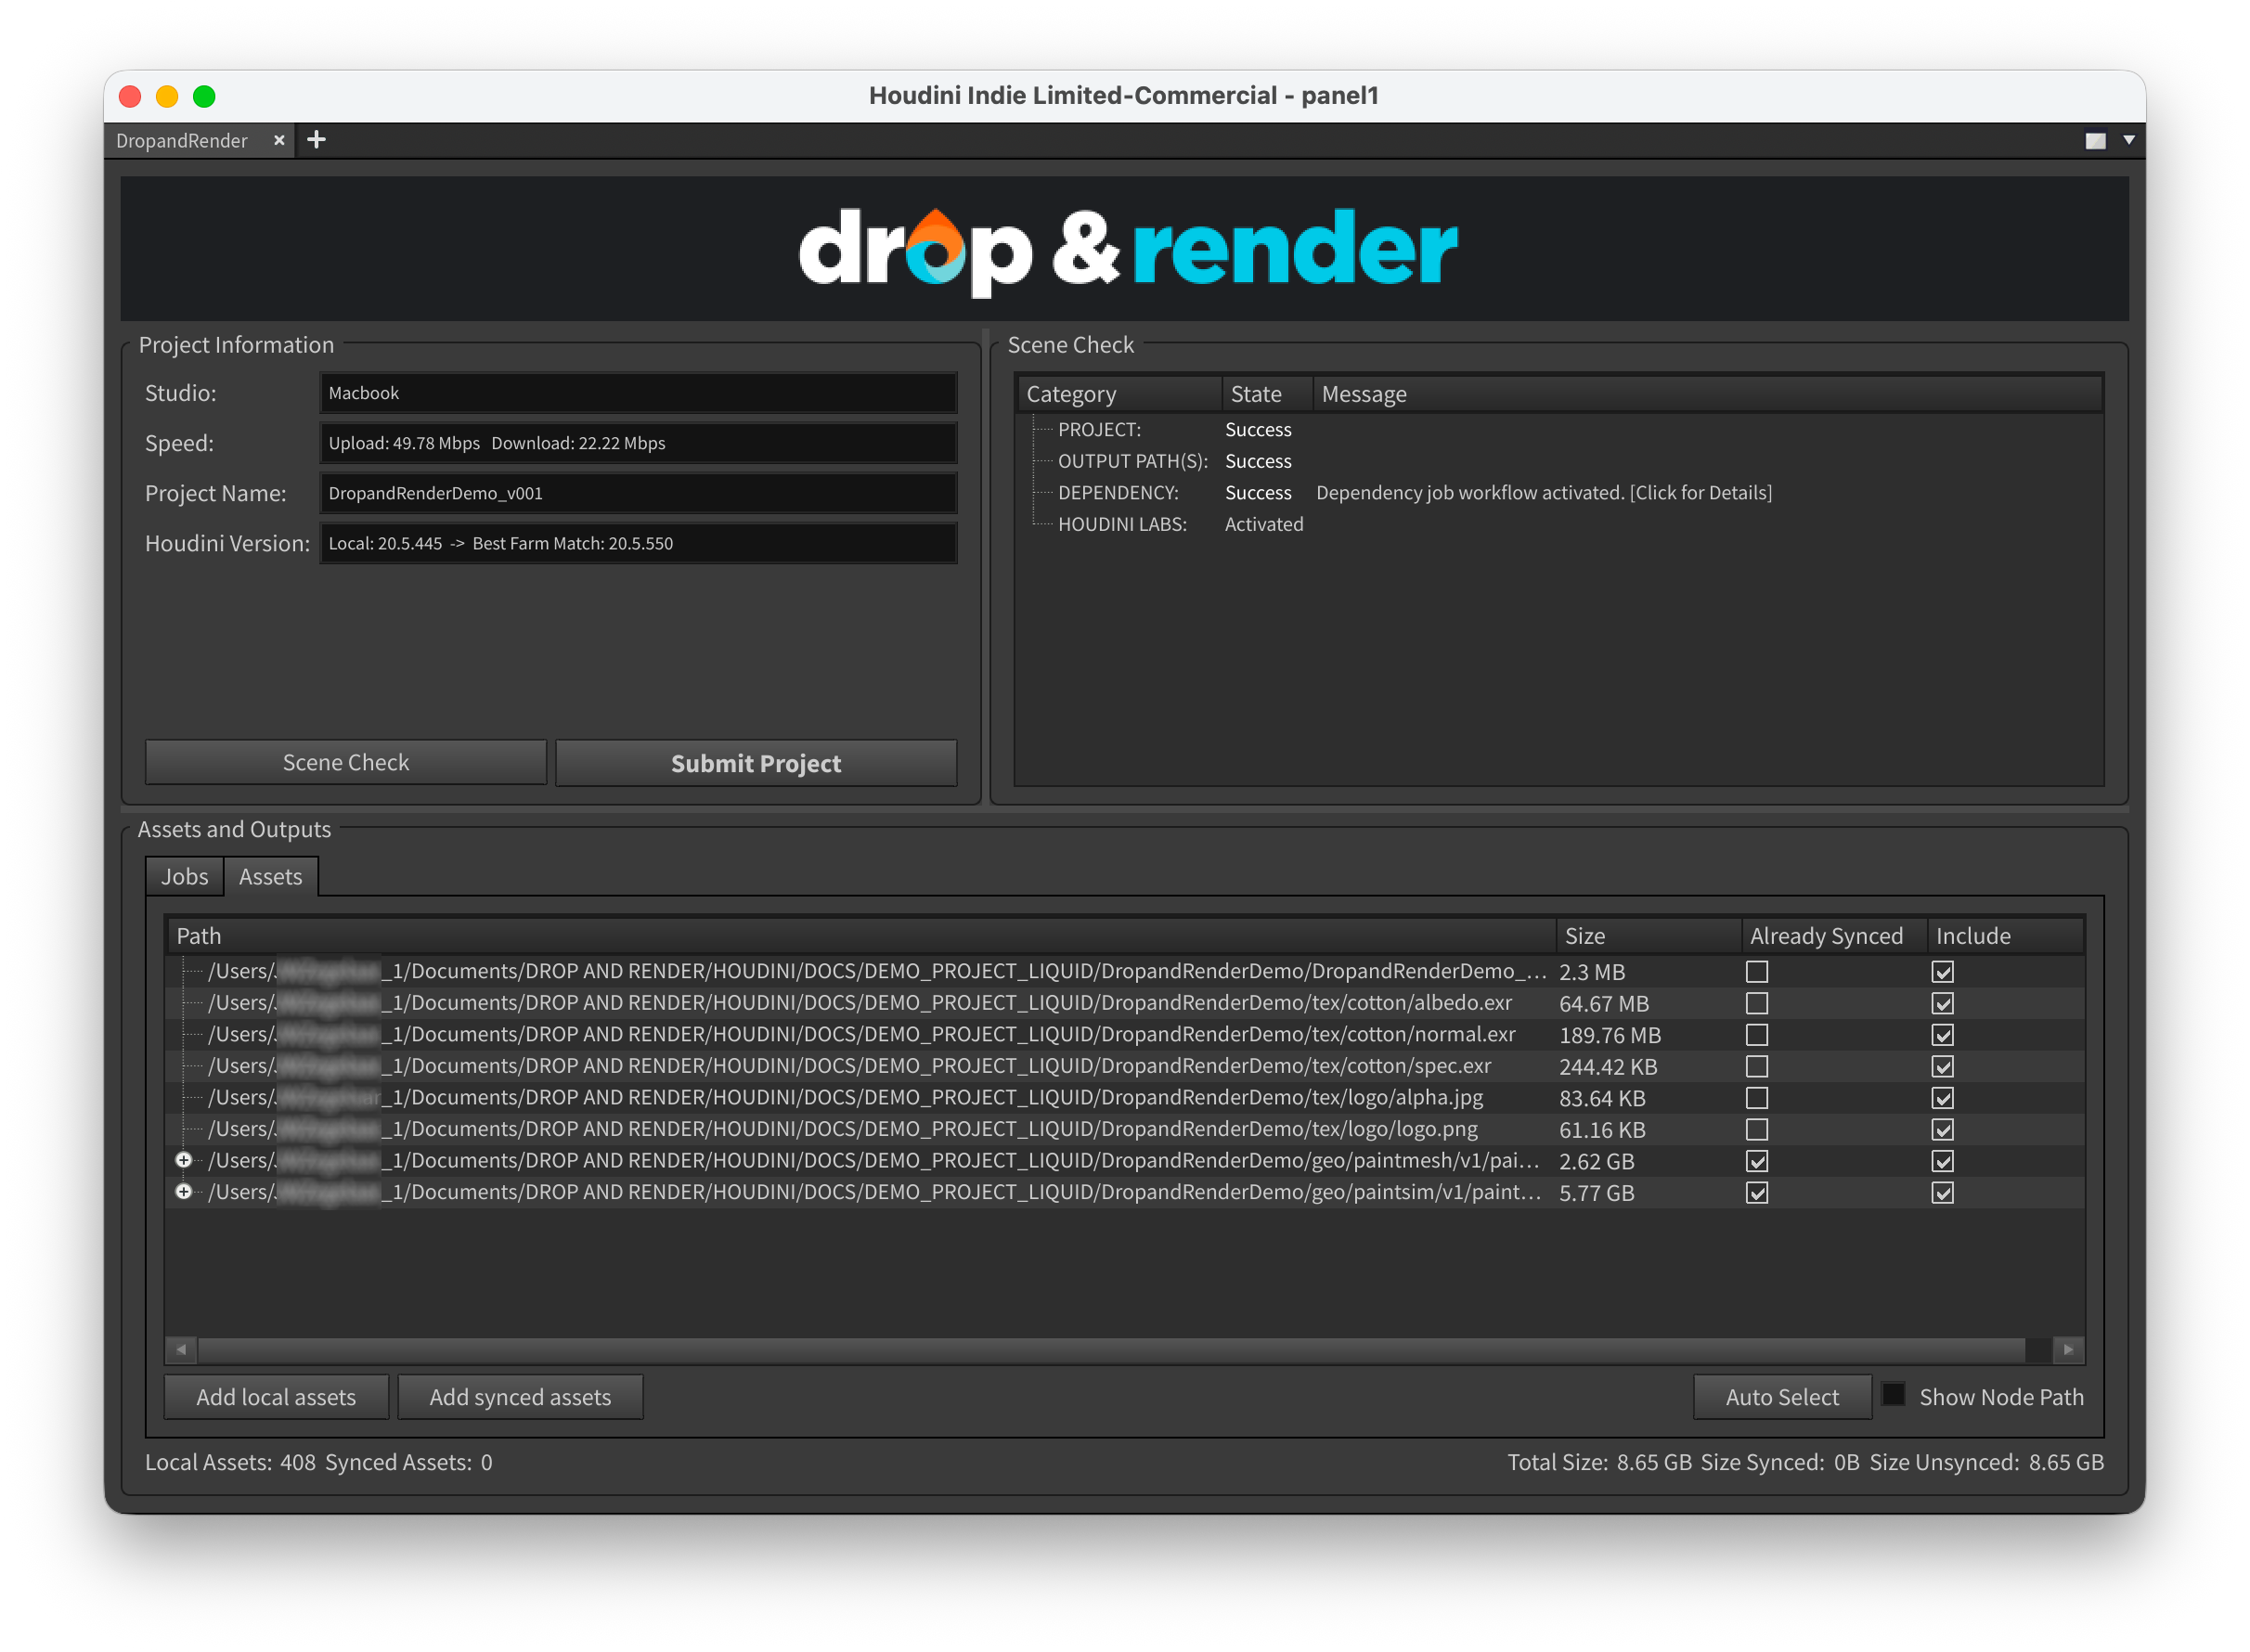
Adding non-detected assets
You can use the Asset panel's "Add local assets" button to add any assets we missed. We would like this option to be completely redundant, so if you find yourself using it often send us a support message and we will update our systems to detect your assets.
Adding synced assets (reusing farm files)
Assets uploaded to the server by any studio user will be available for everyone in that studio for 7 days. If your project needs to reference these you can use the Asset panel's "Add synced assets" option to add them without downloading them to your machine. This also means they won't have to be checked for differences or re-uploaded before your job runs.
Common use cases:
- Simulation → Render workflow: Run a simulation on the farm with downloads disabled, then reference the cached files in a subsequent render job using "Add synced assets"
- Team collaboration: One team member uploads large texture libraries or asset caches, others reference them directly without re-uploading
- Multi-pass rendering: Cache intermediate geometry on the farm, then use it across multiple render passes
How to use:
- In the scene check panel, go to the Assets tab
- Click "Add synced assets"
- Browse the list of files available on the farm (organized by job/date)
- Select the files your current job needs
- Click Add - files appear in your asset list marked as "Already Synced"
The selected files will be available to your render nodes on the farm, exactly as if they were local files, but without any upload time or bandwidth cost.
Auto select
By default, our system lists every file linked to your Houdini project. If your scene includes many assets that are not required for the render(s) you want to submit, you can filter them with the auto select feature. This option selects only the assets that are actually used within specific networks.
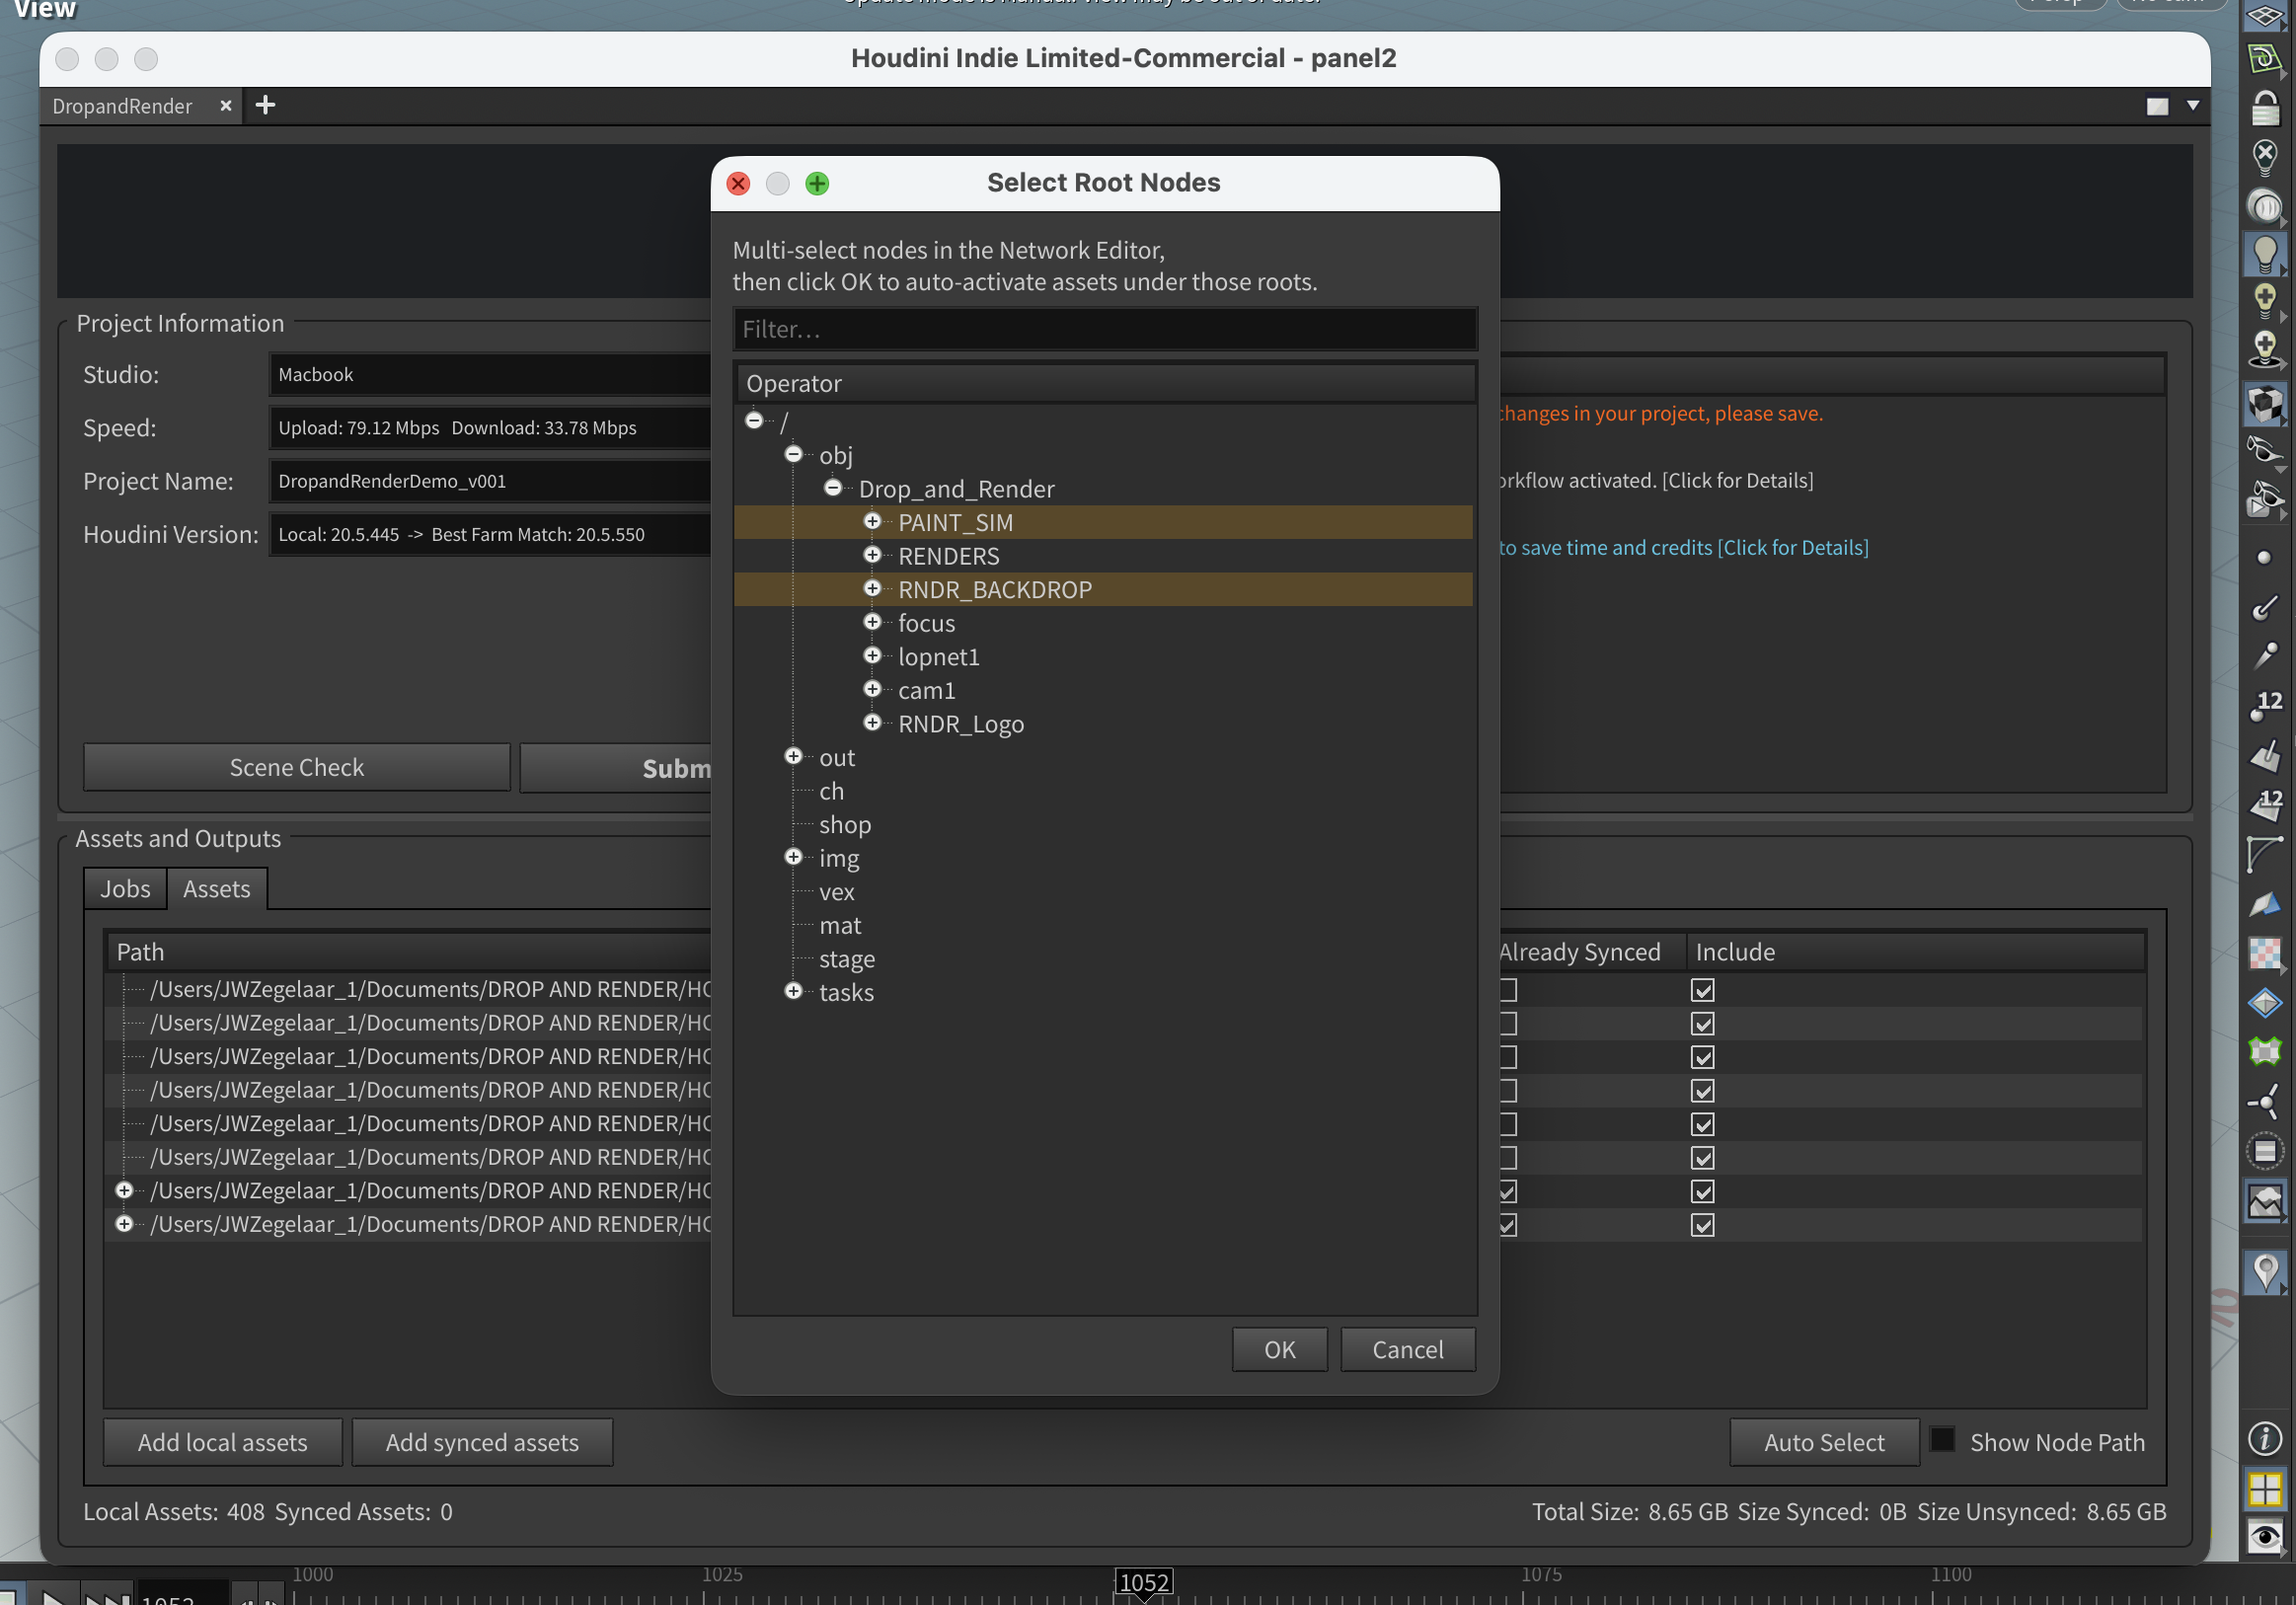
When you open this panel, select the networks required for your render. Use Ctrl on Windows or Command on macOS to select multiple networks. The system will then upload only the assets used inside those networks, ignoring everything else. This keeps your upload clean and avoids transferring unnecessary files.
Upload summary (bottom right)
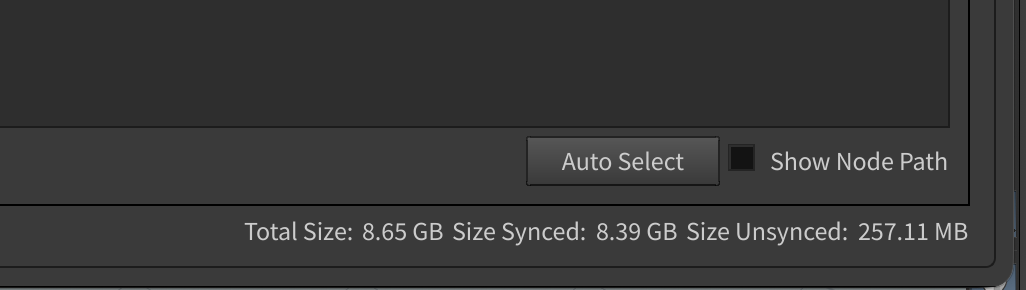
The status bar shows information on the project's upload state. You can use it to sanity check upload sizes before uploading.
Parameter reference
Customizing your global and per-render settings
Standard

Priority
Sets the default priority for any submissions. A higher priority will boost your place in the queue, but also cost more money. Check our pricing page for more information.
Available: Globally (in node inspector) and per submission.
Custom slice number
Sets the default number of frames each machine will handle. A higher value is great for quick frames where startup time (~1-2 minutes) is a significant portion of the full render. On heavier frames a smaller number is preferred, as more individual machines working on it at the same time will cut down on time.
Available: Globally (in node inspector) and per submission.
Frame range & Frame range source
Sets the frame range to be rendered. The default behaviour inherits this setting from the connected nodes' settings. Change the node inspector "Frame range source" parameter to "Overwrite frame range" to overwrite the default for every submission's range.
Available: Globally (in node inspector) and per submission.
Advanced
Send report
Sends a report to the Drop & Render support. Reports contain all log files generated by the plugin, as well as some basic system specs. Your project files are not shared.
Use only when asked by a support agent.
Available: Globally (in node inspector).
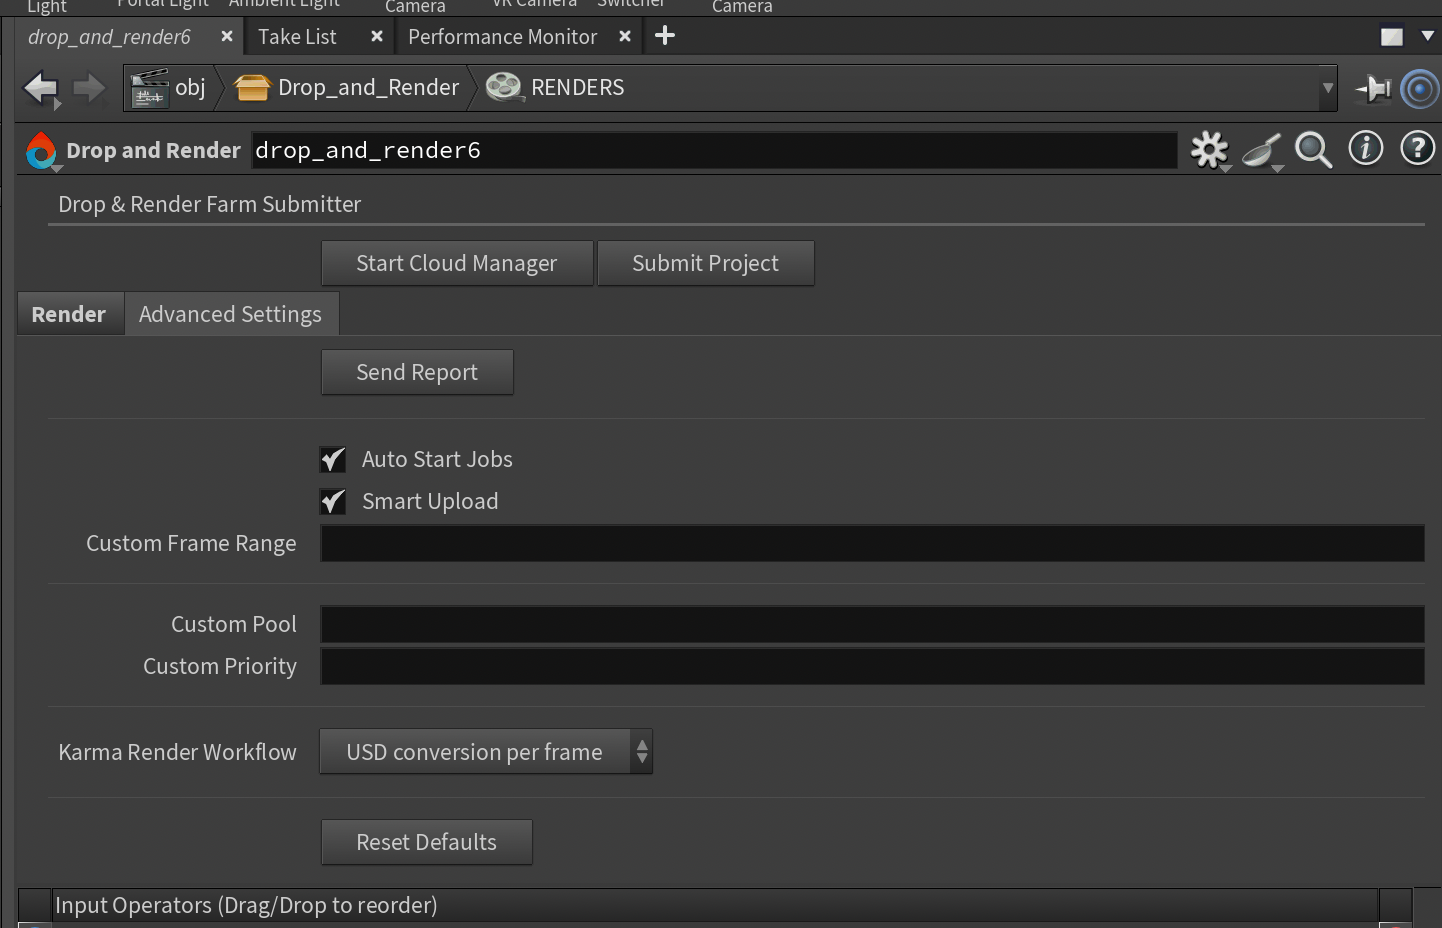
Auto start jobs
Sets whether to queue jobs as soon as they arrive at the render farm. If not set, jobs may be started from the Cloud manager interface.
Available: Globally (in node inspector).
Smart upload
Smart Upload automatically scans your scene for all referenced assets, uploads them, and remaps the file paths on our side so the project renders correctly on the farm. This works very well for most standard or relatively simple scenes.
For very large or complex projects, Smart Upload can take longer to process. In those cases you can disable it and switch to Manual Mode.
In Manual Mode, you manually add the required files in the Assets tab. This gives you full control over which files are uploaded and is usually much faster for large productions or scenes with many assets.
Available: Globally (in node inspector).
Custom frame range
Sets the specific frames to render using comma-delimited numbers like 0,15,20-25,35.
Useful for testing frames throughout the render.
Available: Globally (in node inspector).
Karma render workflow
Controls how USD scenes are converted and rendered with Karma. Choose between:
- USD Conversion Per Frame (default): Each frame is converted to USD and rendered immediately. Faster submission, quicker results.
- USD Convert All Frames First: All frames are converted to USD files before rendering begins. Better for complex scenes with deep USD hierarchies or conversion issues.
Most projects should use the default per-frame conversion. See the USD/Solaris workflow section for details.
Available: Globally (in node inspector).
Supported Houdini workflows
Using specific Houdini versions
We try to version-match your Houdini with the one available on the farm. We guarantee to match major versions (21.0, 20.5, ...), and we will use the minor/bugfix version you did if we have it available, reverting to the closest one otherwise.
For the most up to date support information, check out our Houdini page.
Using plugins & engines
Our goal is to provide drop-in support for any project you might submit, so we try to make every commonly used plugin and engine available. We support:
- Custom HDAs
- The Karma, Octane, Redshift & Mantra engines
- Houdini Labs
- Mops & Mops Plus
- Qlib
For the most up to date support information, check out our Houdini page.
We even match your local plugin version to the closest we have available on the farm, so there is little risk of plugin version discrepancies causing issues in your render.
Traditional ROP rendering
Drop & Render supports all standard Houdini render engines and export ROPs. All render settings from your ROP nodes are preserved (samples, GI, AOVs, output formats).
Setup
- Create your ROP network (usually
/out) - Add and configure your render nodes
- Add the Drop & Render node to the ROP network
- Connect your render nodes to Drop & Render:
- Single render:
[mantra1] → [Drop & Render] - Parallel renders: Connect multiple nodes to the same Drop & Render node
- Single render:
- Click "Submit project" and run scene check
Geometry and cache exports
Non-rendering ROPs are also supported:
- Geometry ROP:
.bgeo,.bgeo.sc,.geofiles - Alembic ROP:
.abcfiles with animated geometry and transforms - VDB ROP:
.vdbvolume sequences
Use these to export heavy geometry or volumes on the farm, then download for local use or reference in downstream farm renders.
USD/Solaris workflow
Drop & Render fully supports Houdini's Solaris (USD) context and Karma renderer with automatic dependency detection and path remapping.
Setup
- Build your USD scene in a LOP network (usually
/stage) - Add your USD content (imports, geometry, materials, lights, cameras)
- Add a USD Render ROP or Karma ROP node
- Add the Drop & Render node to the LOP network (Tab → "drop")
- Connect your render node to Drop & Render:
[USD Render ROP] → [Drop & Render] - Click "Submit project" and run scene check
What's automated
- USD file detection: All
.usd,.usda,.usdc,.usdzfiles are found automatically - Reference detection: Payloads, references, and sublayers are traced recursively
- Texture detection: Materials and shader textures are detected
- Path remapping: All USD paths are remapped for the farm environment
- Husk rendering: Our farm uses SideFX's native Husk renderer
All render settings (resolution, samples, AOVs, output format) come from your USD Render ROP or Karma ROP node and are preserved exactly.
Karma render workflow modes
When rendering USD scenes with Karma, you have two workflow options:
USD Conversion Per Frame (default, recommended):
- Each frame converts to USD and renders immediately
- Faster submission and quicker results
- Memory efficient - only one frame in memory at a time
- Best for most projects, including animated USD scenes
USD Convert All Frames First:
- All frames convert to USD files first, then all frames render
- Good for complex scenes where conversion is error-prone
- USD files written to disk can be inspected if issues occur
- Use for very complex USD scenes with deep reference hierarchies
Set this in the Drop & Render node's Karma Render Workflow parameter.
Verifying USD assets
After running scene check, always verify the Assets tab for USD files. All referenced USD files must be detected for the render to succeed.
What to check:
- All
.usd*files are listed - All textures referenced in USD materials
- Any volume files (OpenVDB, etc.)
- HDRI environment maps
Common issue - Missing USD references:
If a USD file references another USD file (via reference or payload), both must appear
in the Assets tab. Example:
main_scene.usd
  ├─ references → character.usd
  └─ references → environment.usd
       └─ references → trees.usd
Expected in Assets tab: main_scene.usd, character.usd, environment.usd, trees.usd
If files are missing:
- Check USD file paths in your LOP network (use Scene Graph Tree to inspect references)
- Use relative paths where possible
- Add missing files manually via "Add local assets"
- Contact support if references still aren't detected
Tip: Use Houdini's USD Reference Inspector (LOPs → Right-click node → "Inspect References") to see all file dependencies before submitting.
Simulations and caching
You can run any type of Houdini simulation on the farm by connecting it to our HDA.
Running simulations on the farm
- Set up your simulation in a SOP context (e.g.,
/obj/geo1) - Connect your simulation to a File Cache node
- Configure the File Cache output path and frame range
- Add the Drop & Render node to your SOP network
- Connect the File Cache to Drop & Render
- In the scene check panel's Jobs tab, set Download to "No" for the cache job
- Submit
The simulation runs on the farm and cache files remain on the server for 7 days without downloading to your local machine.
Using farm-stored caches in renders
To render using a cache stored on the farm:
- Set up your render (e.g.,
[File Node] → [Redshift ROP] → [Drop & Render]) - Open the scene check panel and go to the Assets tab
- Click "Add synced assets"
- Browse for your simulation cache files
- Select and add them
- Submit
Your render job will use the farm-stored cache directly. You only download the final renders, saving bandwidth and storage.
Supported cache nodes
- File Cache (SOP): General geometry caching
- Vellum I/O (SOP): Vellum simulations
- RBD I/O (SOP): Rigid body simulations
- Alembic ROP (ROP): Alembic geometry sequences
- Geometry ROP (ROP): Geometry export
- And more...
Using Houdini's PDG system
Cooking PDG projects
Our plugin lets you offload any number of work items for remote cooking. It builds on the standard rendering workflow but adds a few more knobs to configure.
How it works
Your job is split into the longest independent work item chains we can find. These chains are submitted as dependents of each other, so each sub-job will wait for the chains above it to cook.
Project:

[wedge1]
    ↓
[ropfetch3]
    ↓
[ropfetch2]
    ↓
[partitionbyframe1]
    ↓
[imagemagick1]
    ↓
[waitforall1]
    ↓
[ffmpegencodevideo1]
    ↓
[drop_and_render]
Submissions:

├─ wedge1_to_imagemagick1
│  ├─ wedge1
│  ├─ ropfetch3
│  ├─ ropfetch2
│  ├─ partitionbyframe1
│  └─ imagemagick1
└─ waitforall1_to_ffmpegencodevideo1
   ├─ waitforall1
   └─ ffmpegencodevideo1
Configuring downloads
You can set downloads for entire sub-jobs as well as individual nodes. Changing the sub-job setting will change all the nodes within. The downloads are all handled using our standard systems, and each node's output will end up exactly where a local cook would place it.
Per-job downloads:
├─ wedge1_to_imagemagick1 - Download: No
│  ├─ wedge1
│  ├─ ropfetch3
│  ├─ ropfetch2
│  ├─ partitionbyframe1
│  └─ imagemagick1
└─ waitforall1_to_ffmpegencodevideo1 - Download: Yes
   ├─ waitforall1
   └─ ffmpegencodevideo1
Per-node downloads:
├─ wedge1_to_imagemagick1 - Download: No
│  ├─ wedge1
│  ├─ ropfetch3 - Download: Yes
│  ├─ ropfetch2
│  ├─ partitionbyframe1
│  └─ imagemagick1 - Download: Yes
└─ waitforall1_to_ffmpegencodevideo1 - Download: No
   ├─ waitforall1
   └─ ffmpegencodevideo1 - Download: Yes
Cooking partial graphs
By connecting our node further up the chain you can cook smaller parts of your full graph. You can use this to offload work that's hard to run but not frequent, such as simulations, to the farm, while still keeping lighter tasks local. This lets you get quicker results initially and iterate fast & locally later on.
Project:

[wedge1]
    ↓
[ropfetch3] → [drop_and_render]
    ↓
[ropfetch2]
    ↓
[partitionbyframe1]
    ↓
[imagemagick1]
    ↓
[waitforall1]
    ↓
[ffmpegencodevideo1]
Submissions:

└─ wedge1_to_imagemagick1
   ├─ wedge1
   └─ ropfetch3

